We have helped groups, organizations, and businesses set up simple websites that have what we refer to as a FCG or DCG.
Here are the simple steps to make an image show up in the DCG/FCG.
Step 1. Make a post
The first step is simply making a post. Here is an example we will be using the rest of the time:

Step 2. Get into the Editor
With this site, if you are logged in you can simply click the edit button near the title.
This should bring up something like this:

We will mess with three items
1. Add an Image – where we find the URL to the image
2. Dynamic Content Gallery Metabox – where we need to paste the URL to the image in
3. Categories – you must make sure the proper category is selected, in this case it is FCG
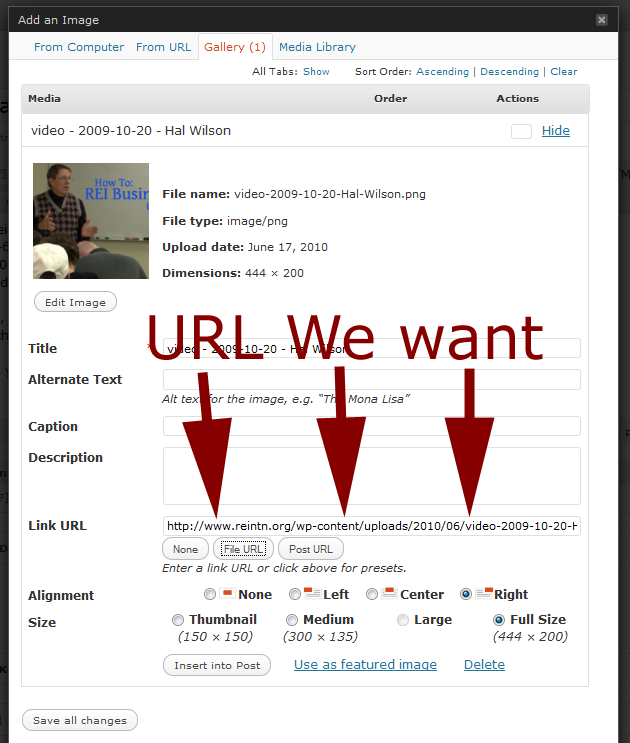
Step 3. Go Find the URL 
First thing is to click the “Add an Image” (#1) button. This should bring up a box, either upload the image, or find it in either the Gallery (if it is already in the post) or Media Library. In this case it is in the Gallery.
We want the box that reads “Link URL” to display the proper URL to the image.
To make this happen, we click the “File URL” button.
This will cause the box to be filled with the URL to the file. Like this:

Step 4. Copy & Paste
Simply copy and paste that URL into the Box (#2) … notice how the URL’s are the same in the next image:
 NOTE: don’t click the “Save all changes” button, it is not needed, just click the [X] in the upper right.
Step 5. Check the Categories
The FCG or DCG will have a category that it pulls from. That means that the post MUST be put in that category for it to work.


 We like WordPress & use it as a core for all the sites we are involved with.